Installing A Drupal Package


Drupal is a content management system (CMS) that makes it easy for anyone to create their own website. For more information about Drupal see my previous hub, Using Drupal.
Requirements of a Drupal site
When you have found out what Drupal is and decided if it is the right solution for you, you have to install the Drupal core package. Before you can get Drupal up and running you will need the following:
- a domain
- a web host
- FTP access to your web host
The Domain is the address at which you can access your site. For instance, hubpages.com is a domain. You can buy a domain for under $10.00 a year from a myriad of providers. Just google the term 'purchase domain name' and you'll be overwhelmed by the options.
The Web Host is a provider that gives you space on their server to run your site, most likely a hosting company. In selecting a web host you will have to be a bit more picky. You will need to select a web host that uses an Apache environment, supports PHP 5.2 and MySQL 5.0. However, don't worry, as most web hosts meet these requirements.
FTP access: Your web host must also offer FTP access to their web server that your site is stored on. SSH access is recommended, but not essential.
So before you pick your web hosting provider, make sure you ask them if these requirements are met. If they want to keep up with their competition, they will most likely answer yes.
Installing Drupal
Overview
- Obtaining the Drupal core package
- Extracting the package and renaming 1 file
- Creating a MySQL database and a user
- Uploading the extracted package to your web folder
- Completing the installation wizard.
1. Obtaining the Drupal core package:
Go to drupal.org and download the latest version of Drupal to your computer. You will find this at the top of the right sidebar under the heading Download. At the time of writing this article the latest package is Drupal 6.14.
2. Extracting the package and renaming 1 file:
The Drupal package comes in a zipped format with a .tar.gz extension. Most file archivers will extract the file. After you have done so, navigate to sites/default directory within your Drupal folder. Make a copy of the default.settings.php file, rename it to settings.php and place it in the sites/default directory.
3. Creating a MySQL database and a user:
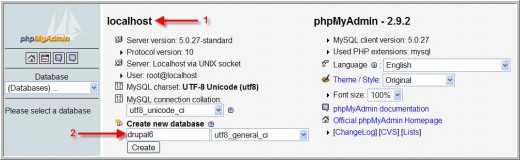
In your web browser go to http://mydomainname.com/cpanel and sign in with the cpanel username and password that you received from your web host. Once inside find the PHPMyAdmin page and create a new database as shown in the screen below.
Now, create a user for your new database by clicking the SQL tab and entering the following text in the text field:
GRANT SELECT, INSERT, UPDATE, DELETE, CREATE, DROP, INDEX,
ALTER, ON databasename.*
TO 'username'@'localhost' IDENTIFIED BY 'password';
Change the databasename to the name of your database. If you copied the screenshot above, the name of your database is drupal6. Furthermore, change the username and the password to a username and a password of your choice. Note these down as you will need them to complete the installation wizard later. Now, hit Go.
4. Uploading the extracted package to your web folder:
Use an FTP client to upload the extracted Drupal core package to your web folder (www). On a Windows system, I would use the FTP function of Total Commander. If you are running Linux, I recommend the FTP function of Krusader.
If you are using Krusader, go to Tools - New Connection. In the resulting window enter your domain name into the machine name field, leave port at 21, and enter your FTP username and password provided by your web host. Click connect. (If it doesn't work try using ftp.mydomainname.com for the machine name field. If it still doesn't work, email your web host and ask what you are doing wrong.)
Once logged on to the server place the entire content of your Drupal folder into your root directory on the server (www). Again, copy the content of your Drupal folder, not the folder and its content!
5. Completing the installation wizard:
In your browser, navigate to your site. You'll see a screen that basically has two options. Click the 'Install Drupal in English' link. You arrive at the database configuration screen where you select MySQL as the database type, enter your database name (drupal6), enter the username and password that you have chosen for the database user. (These are the ones that you noted down.)
(For the majority of installs the advanced options are not needed. If you have run out of luck, you'll need to change the Database host field setting from localhost to something else, which you can find by going back to your PHPMyAdmin screen and looking at what's in place of 'localhost' as shown in the previous screenshot and marked as 1.)
Click save configuration and if everything went well, you'll be presented with the Configure site screen. By filling in the configuration form you create the first user account, which is your admin account. This admin account will automatically have full rights over all aspects of your site. Choose your username and password wisely and as with every password, never let anyone know what it is. Now, save and continue and you are finished. Congratulations! You can visit your Drupal site.

So this is the way I usually do it written out step by step. If you get lost at any point or have problem making sense of something you can watch this video, which demonstrats a Drupal installation. It's a bit different from the way I do it, but they essentially do the same thing.
I hope you find this article helpful. If you have any questions, leave a comment. Thanks for reading.


")